How to Make a Log Cabin Quilt Block – With Measurements & Step-by-Step Guide
The Log Cabin quilt block is one of the most iconic designs in quilting history—and it’s also one of the most beginner-friendly. This timeless block is made by building out from a center square, adding “logs” around it in a spiral pattern. In this tutorial, you’ll learn how to make a Log Cabin quilt block using the exact cutting measurements shown in the image above. Whether you’re brand new or just looking for a simple, satisfying project, this is the perfect block to stitch up!
🧵 What Is a Log Cabin Quilt Block?
The Log Cabin block starts with a center square—often symbolizing the hearth of a home—and grows outward by sewing fabric strips (called logs) around it. One side of the block is typically made with darker fabrics and the other with lighter ones to create contrast and movement in the finished quilt.
✂️ Fabric Requirements & Cutting Chart
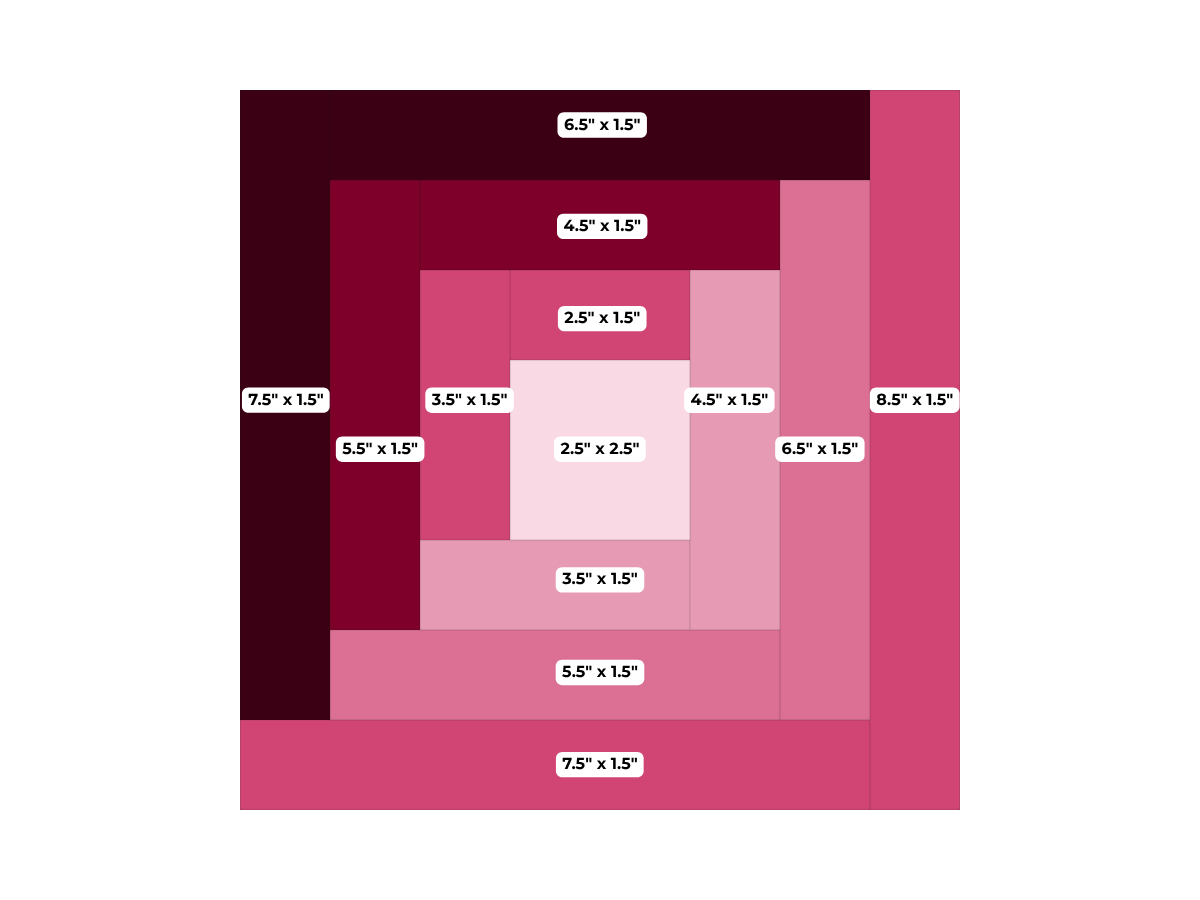
This version finishes at 8.5" x 8.5" unfinished (8" finished in a quilt). You’ll use 1.5" wide strips for all the logs.
Here’s exactly what you need to cut:
Center Square:
(1) 2.5" x 2.5"
Logs:
2.5" x 1.5"
3.5" x 1.5"
4.5" x 1.5" (cut 2)
5.5" x 1.5" (cut 2)
6.5" x 1.5" (cut 2)
7.5" x 1.5" (cut 2)
8.5" x 1.5"
You’ll end up with 9 logs total, added in pairs (top/bottom or side/side) as you spiral around the center.
🪡 Step-by-Step Instructions
1. Start with the Center
Place the 2.5" x 2.5" square in the middle. This is the foundation of your block.
2. Add the First Log
Sew the 2.5" x 1.5" strip to the right side of the center square using a ¼" seam allowance. Press the seam away from the center.
3. Add the Second Log
Sew the 3.5" x 1.5" strip to the bottom of the unit. Again, press the seam.
4. Continue Building
Follow this sequence:
Add 4.5" strip to the left
Add 4.5" strip to the top
Add 5.5" strip to the right
Add 5.5" strip to the bottom
Add 6.5" strip to the left
Add 6.5" strip to the top
Add 7.5" strip to the right
Add 7.5" strip to the bottom
Add 8.5" strip to the left
You’ll notice each new log gets a little longer, forming the spiral look that defines the Log Cabin block.
🔄 Always press your seams flat before adding the next log for a smooth, square result.
💡 Pro Tips
Use a consistent seam allowance for accuracy.
Pre-cut all your strips and arrange them by order to stay organized.
This block is great for scraps—try mixing up the fabrics for a scrappy log cabin effect!
🧩 Layout Ideas
Once you’ve made a few blocks, try these classic layouts:
Barn Raising – Blocks form concentric diamonds.
Straight Furrows – Creates a zigzag or striped effect.
Light/Dark Half Squares – Alternate light and dark sides for a modern twist.
The possibilities are endless with this flexible block!
Have you made a Log Cabin block before? Share your fabric color combos or favorite layouts in the comments—I’d love to see what you’re stitching!
Happy quilting,
Tiffany @ Straight Stitching 🧵💛
